Introduction
GridView 의 header 를 유지하는 방법에 대해 살펴보고자 합니다.
Example
우선 Northwind 데이터베이스의 Customers 테이블을 가지고 작업을 하겠습니다.
CustomerID, CompanyName, ContactName, Country 을 쿼리문장으로select 를 합니다.
(SELECT [CustomerID], [CompanyName], [ContactName], [Country] FROM [Customers] ORDER BY [CustomerID])
Panel 컨트롤을 드래그하여 웹폼에 둡니다.
<asp:Panel ID="Panel1" runat="server" Height="200px" ScrollBars="Auto" Width="100%">
내용이 Panel 크기의 범위를 벗어 났을때 스크롤바를 보여주기 위해 ScrollBars="Auto" 을 지정했습니다.
새로운 html 테이블을 아래와 같이 panel 컨트롤 안의 제일 위에 4개의 컬럼을 추가했습니다.
<table cellpadding="0" cellspacing="0" class="fixedheadertable">
<tr>
<td class="fixedheadercell">
Customer ID</td>
<td class="fixedheadercell">
Company Name</td>
<td class="fixedheadercell">
Contact Name</td>
<td class="fixedheadercell">
Country</td>
</tr>
</table>
Add a new CSS style sheet to the web site and create two CSS classes as shown below:
아래와 같이 css 스타일 쉬트를 웹사이트에 추가했으며, 2개의 css 클래스를 보여주고 있습니다.
.fixedheadercell
{
    FONT-WEIGHT: bold;
    FONT-SIZE: 10pt;
    WIDTH: 200px;
    COLOR: white;
    FONT-FAMILY: Arial;
    BACKGROUND-COLOR: darkblue;
}

.fixedheadertable
{
    left: 0px;
    position: relative;
    top: 0px;
    padding-right: 2px;
    padding-left: 2px;
    padding-bottom: 2px;
    padding-top: 2px;
}

.gridcell
{
    WIDTH: 200px;
}
fixedheadercell 클래스는 4개의 테이블의 셀에 적용했습니다. 이 css 클래스에 대해서는 어떤것도 특별히 한것이 없습니다. 두번째 fixedheadertable 의 css 클래스가 눈여겨 볼 부분입니다. 이는 position 이 relative 로 설정되어 있는 것을 알 수 있는데요. left 와 top 의 위치값이 동일합니다. fixedheadertable 클래스는 테이블에 적용되어 있습니다. gridcell 의 css 클래스는 GridView 컬럼에 적용되어 있고요.
<Columns>
<asp:BoundField DataField="CustomerID" HeaderText="CustomerID" ReadOnly="True" SortExpression!="CustomerID">
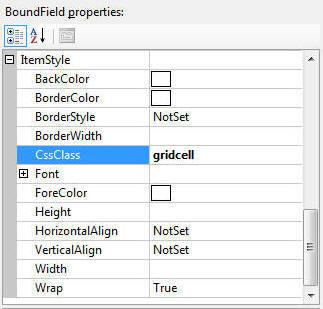
<ItemStyle CssClass="gridcell" />
</asp:BoundField>
<asp:BoundField DataField="CompanyName" HeaderText="CompanyName" SortExpression!="CompanyName">
<ItemStyle CssClass="gridcell" />
</asp:BoundField>
<asp:BoundField DataField="ContactName" HeaderText="ContactName" SortExpression!="ContactName">
<ItemStyle CssClass="gridcell" />
</asp:BoundField>
<asp:BoundField DataField="Country" HeaderText="Country" SortExpression!="Country">
<ItemStyle CssClass="gridcell" />
</asp:BoundField>
</Columns>
그리고 웹폼에 <link> 태그를 사용해서 StyleSheet.css 를 사용하도록 했습니다.
<link href="StyleSheet.css" rel="stylesheet" type="text/css" />
GridView 의 속성값 중에 AutoGenerateColumns 을 false 로 하며, gridview 의 해더를 보이지 않도록 ShowHeader="False"
로 지정했습니다.
<asp:GridView ID="GridView1" runat="server" AutoGenerateColumns="False" CellPadding="4"
DataSourceID="SqlDataSource1" ForeColor="#333333" GridLines="None" ShowHeader="False">
아래의 이미지는 BoundField 에 gridcell css 의 클래스를 지정하고 있습니다.
자~~~ 웹폼을 실행시키면 아래와 같은 예제를 보실 수 있습니다.
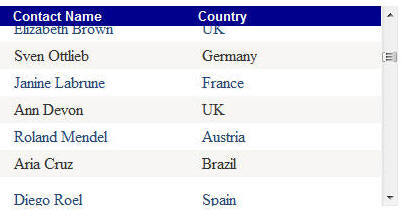
보시다시피, gridview 의 header 가 위에 고정되어 있는것을 보실 수 있습니다.
감사합니다.
'마루아라는 개발쟁이 > ASP.NET' 카테고리의 다른 글
| ASP.NET에서 웹 서버에 파일 업로드 (0) | 2022.12.06 |
|---|---|
| GridView의 field를 hidden field로 (0) | 2022.12.06 |